I'm excited to say that this post is a guest post for SONP! This is not a true tutorial ~ I hope to inspire you to branch out and enhance your sewing skills! =)
(the Regular Zipper post can be found here)
~~~~~~~~~~~~~~~~~~~~~~~~~~~~~~~~~~~~~~~~~~~~~~
After you get past the top section of tutorials & videos, you will find photos and notes that I made because, frankly, I wanted more info than any one person will share... Hopefully it makes sense to you, and inspire and not daunt you! The grey skirt is only my second IZ, and the yellow dress is my first IZ.
(I found some invisible zipper tutorials that do not call for an invisible zipper foot, that was helpful, because I don't own an IZ foot, but I watched/read them all.)
Please make sure that you join my giveaway- it's a $25 gift certificate for Allegro Fabrics! (join using the web gadget found HERE!)
Regular Zipper Foot:
http://artandneedlework.blogspot.com/2012/01/12012-tutorial-how-to-insert-invisible.html
Invisible Zipper Foot:
http://www.coletterie.com/tutorials-tips-tricks/tutorial-installing-an-invisible-zipper
(Regular Zipper Foot) Video 1:
(or watch here)
(Invisible Zipper Foot) Video 2:
(or watch here)
(And because putting a zipper into a garment is different than just plain fabric I found this helpful...)
Video 3:
(or watch here)
~~~~~~~~~~~~~~~~~~~~~~~~~~~~~~~~
Before you start a zipper, be sure that you are not overly tired, and eat a little something if you are hungry. While you are sewing, Drink Water, Remember to Breathe (I'm not kidding), Pray/Think Positively and last of all, Go Slow/Don't Rush- there is no prize or award for finishing first! =)
Remember: these photos are intended to round out other Tutorials and videos. =)
 |
| After ironing the zipper teeth, place "right" side on the zipper to the
"right" side of the fabric. (by "right" side I mean the outside/pretty side) |
 |
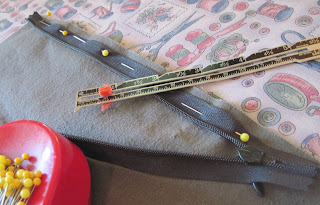
| Use your seam gauge to measure 5/8" from the inside zipper edge to the fabric edge. |
 |
| Must have tools: Pins & a Seam Gauge |
 |
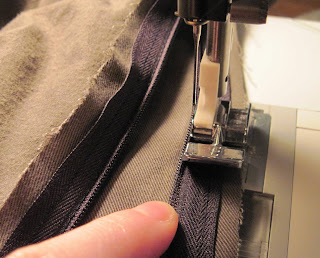
| (this is not an IZ foot) Then start again at the top, and use both hands (breathe!), and sew! And then smile. =) |
 |
| The first side is done~ "right sides together" |
 |
| Lay the fabric "right sides together", with the zipper selvage pointing to the fabric selvage. IMPORTANT: Pin the fabric at the notch/large dot before you measure & pin the last zipper side down. |
 |
| On this skirt (I don't remember on the dress), I decided that it was easier to start basting at the base and on up to the top |
 |
| After basting, you can sew from either direction! (Remember to breathe & smile) |
 |
| Zip it up to make sure that everything is correct so far! =) |
 |
To me, this is the hard part- keep the zipper tail free,
while you sew the seam below the zipper. |
 |
| Trim the extra fabric close to the zipper edge... |
 |
| Now the fun part- use a large zig~zag to run over/attach the selvages together- they look so nice, and the fabric won't fray, and jam your zipper. =) |
 |
| Your zipper project is now complete! |
~~~~~~~~~~~~~~~~~~~~~~~~~~~~~~~~~~~
Please pop over and read other great SONP posts! (#SONP2013)
~~~~~~~~~~~~~~~~~~~~~~~~~~~~~~

No comments:
Post a Comment